I love costuming. I love the whole process from talking to the choreographer to drawing out the design to choosing the fabrics and trims and finally creating what was in our minds. So, recently, when I was asked to design and sew a costume for a young dancer who is to perform the Arabian dance from the Nutcracker Ballet, I jumped at it. I love this dance and the music. It is mysterious and sensual, full of the scents and tastes of the middle east. I wanted to fully capture the flavors in a costume for a 12 year old girl. Yikes!
The choreographer always has a vision of what she wants. Trying to see her vision and translate that into a 3 dimensional product is the challenge. You have to take into consideration the age of the dancer, and her size. You have to be aware of the types of movements as the dance flows.
(Unfortunately, my dress form is old and falling apart and doesn't really show the costume well.)
The choreographer, Amber, wanted rich burgundy and golds. I found these fabrics that are more cranberry but beautifully embroidered with pink and white flowers and covered in sequins. The skirt is a mesh knit and drapes and flows beautifully a quality I look for in a dancer's costume. Amber was sold.
She wanted the skirt to be longer in the back than the front so I cut a full 60 inch circle and put the waist hole off center so that the front was 23 inches and the back 37 inches.
Amber wanted the skirt drawn up in the front. She also wanted lots of trim. I put beaded fringe below the yoke and gold fringe around the skirt. Gold tassels hide where I used ribbon to pull the skirt up. The ribbons allow the skirt to be adjusted to the height and drape that the dancer wants.
The top also has lots of trim. We wanted a sweetheart neckline and little cap sleeves. This fabric is a lovely sheer which I overlayed on an iridescent silk.
Gold and berry trim at the neck and jangelly red and gold beads with sequin trim finish off the top. Finally, a red gem in the center adds one more bit of sparkle.
The trouble with sleeves is that when a dancer lifts her arms the sleeve can't be too tight, nor should they lift the top up as she moves. These are not connected at the armpit.
All in all I think the costume turned out nicely. It danced beautifully and allowed movement. I was quite happy with it.
Tuesday, November 29, 2011
Wednesday, November 9, 2011
Birdbath Part Deux
Our email conversations went like this. Aaron, "I like your blue birdbath." Me, "Thanks. Want One?" Aaron, "Sure. :-)" So when I visited my son and his wife, Jane, in Houston, Texas we rolled up our sleeves and got to work.
Aaron had an old pottery birdbath that we dug out of the shed. It was pretty dirty and needed a good scrubbing.
Some clean water and a scrub brush got it clean. Then I let it dry in the hot Texas sun.
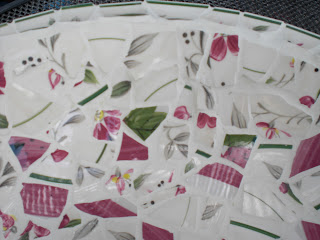
We needed some plates to break up for the mosaic work, so one night after dinner, about 8:00, we packed up the baby and headed for a nearby Goodwill. That store is great for finding treasures. Alas, these were the only plates with a colorful pattern that we could find.
We gave Goodwill our $8.00 and left the store with 5 plates and a bowl that kind of matched. The pattern is a bit too fussy and pink for my taste but our shopping had time constraints.
After donning some stylish protective eye wear, I placed some plates inside a paper bag and gave them some good wacks with a hammer. The bag keeps the shards from flying all over the place.
I was able to cut the larger pieces with a tile cutter, a luxury I didn't have on my 1st attempt. This was a very handy tool.
Once again, I used the rim of the plates for the rim of the birdbath. It gives it a smooth, finished look. Then I began placing the tiles down the side, "buttering" the backs of the tiles with mastic, or tile glue.
The tiles are set and ready to be grouted.
Note that there is a lot of space between the pieces. That's okay as the grout will fill in and the tiled area will not be walked on.
Now I wait for 24 hours before I grout.
I used a pre-mixed white grout and applied it with a putty knife working it into the crevices with an old paint brush. Then I took Jane's kitchen sponge and started wiping off the excess grout. That turned out to be a bad idea since it left bits of sponge between the tiles. I did replace Jane's sponge.
A damp cloth, (ripped up old t-shirt) proved a better solution. I wiped off most of the gooey stuff rinsing the cloth in a bucket of water, then took dry cloths to finish and polish. I had to re-grout some areas where I got over zealous.
The finished product on it's stand in the garden. In hindsight, I wish I had used a colored grout as there was so much white tile. Mother Nature and abuse should soften the look, though, I think.
I had a wonderful time visiting my family and playing with my 1 year old grandaughter, Olive. I hope to visit again soon.
Here is Jane and Olive. She's wearing a tutu I made her for her birthday.
Wednesday, November 2, 2011
Christmas is in the air
I'm visiting my wonderful son, Aaron, his beautiful wife, Jane and their oh so cute baby, Olive in Houston, Texas. That's Olive in the picture far right on the top. I'm enjoying every minute with them and while daddy is at work Jane and I have been playing on Etsy. Jane is very good at navigating the web site and is teaching me so much. We put together this page of treasury items that we hope will be featured on the site. It contains some of my artwork from my Etsy shop: StOngeStudio and Jane's shop: PrettyLittlePicnic. We hope that you like what we put together. The other shops featured have very interesting things, too. Have fun looking.
Subscribe to:
Posts (Atom)