Oh, Halloween, I love it! I have always decorated for this freakish holiday but unfortunately, after many years, my decorations have broken or look old and in disrepair. Thankfully, with the help of pinterest, I have new found excitement in making decorations. With a can of black paint, some finds from Goodwill and the Dollar Tree, I was able to add to my trove of decorations cheaply and creatively.
I found this sconce at Goodwill for $3.
I am not a gold filigree type of person
but thought it would be a perfect
medieval candle holder
Inexpensive flat black paint from Walmart.
A feather pick from JoAnn Fabric,
a black crow from the Dollar Tree, some
spider webs and......
My sister found those awesome candles. They are battery powered and I love the red blood dripping down.
My next project was this spooky village found from this ladies blog here.
I loved this idea and so I went right down to the local dollar store to buy 5 houses, some trees, and some towns folks.
They look too cute and Christmasy
First coat of paint. You can still see the underlying
colors.
A spooky mansion.
The Church with a couple of grave diggers.
The bridge in a sea of fog. And what is that man
carrying on his back?
I put down some wrinkled black tulle, then some "creepy cloth" and twinkle lights, covered it all with spider webs and here is the finished village. All for under $15.
Sunday, October 21, 2012
Wednesday, March 7, 2012
HAIDA KILLER WHALE
The Killer Whale is one of my family totems and so I thought it would be a special design for us.
I started with many, many drawings, bits of design and fragments of anatomy and finally put the concept on a large sheet of craft paper. I had covered the piece of wood with the paper and traced it's outline, so I knew where my design had to fit.
I used carbon paper to trace my design onto the maple. Then I began painting with black acrylic paint.
I needed to thin the black paint so that it would glide across the wood and so I knew it would take two coats.
After I painted in the red design element this is what it looked like. A killer whale can be identified by its blowhole, teeth, pectoral and dorsal fins and tail.
The finished piece. KILLER WHALE
Thursday, January 26, 2012
JAY'S ARTSHOW
My brother Jay was born with Down Syndrome. He will turn 50 on February 22. He was lucky enough to live with his parents until three years ago, when his mother died. Now he lives happily on Bainbridge Island, with my sister Lynn. Four days a week he attends a special needs, adult activities center, called The Stephen's House, where he participates with other people like him. He goes swimming, sees movies, works on projects, and looks forward to it every day. Some of the clients of Stephen's House recently, were asked to show their artwork in a gallery called Bainbridge Arts and Crafts. Jay and I often work on watercolor paintings together so he had several paintings that were ready to show. Here's a preview.
Here is Jay working on his painting of an avacado. This is in my studio.
You have to forgive my photography. The pictures are a bit askew and I kept picking up my flash in the photo.
This is a pictures of Avacados, framed. His paintings will hang in the gallery from Feb. 2 to 28.
Jay went home after our session together and worked on this painting/collage on his own. I love it as it is such a wonder of tiny pieces of paper and tape. He painted some and drew on some and filled in with colored paper.
It really is a marvel up close.
He painted these ears of corn during the summer.
Bell peppers. This reminds me of Tuscany somehow. Maybe it's the ochre background or the red matte, but it speaks of the Mediterranean to me.
Green Onions. He really nailed the complicated structure of the green part.
Country Mailbox. The foliage behind the mailbox is the real story in this painting.
So there you have it. A preview of Jay's next art show. If you feel like a ferry ride, come to Bainbridge Island and see it during the month of February.
The opening of the show will be February 3 for a "meet the artist" event from 5 to 7 PM.
You can also check out my earlier blog about Jay here. http://www.reneestonge.blogspot.com/2011/06/jay.html
Here is Jay working on his painting of an avacado. This is in my studio.
This is a pictures of Avacados, framed. His paintings will hang in the gallery from Feb. 2 to 28.
Jay went home after our session together and worked on this painting/collage on his own. I love it as it is such a wonder of tiny pieces of paper and tape. He painted some and drew on some and filled in with colored paper.
It really is a marvel up close.
He painted these ears of corn during the summer.
Bell peppers. This reminds me of Tuscany somehow. Maybe it's the ochre background or the red matte, but it speaks of the Mediterranean to me.
Green Onions. He really nailed the complicated structure of the green part.
Country Mailbox. The foliage behind the mailbox is the real story in this painting.
So there you have it. A preview of Jay's next art show. If you feel like a ferry ride, come to Bainbridge Island and see it during the month of February.
The opening of the show will be February 3 for a "meet the artist" event from 5 to 7 PM.
You can also check out my earlier blog about Jay here. http://www.reneestonge.blogspot.com/2011/06/jay.html
Monday, January 23, 2012
I know it's not Halloween but....
Recently I was asked to help with the costumes for a play called "Dig It." It will be performed at my grandson's school. They needed skeleton shirts for a full class of children. We had to make them quickly and cheaply.
I knew just what to do. I would make some stencils and paint the rib cage and arm bones onto black shirts.
I will take you through the process.
First I bought some clear acetate sheets from my local art store. The sheets measured about 16 x 20 inches and were pretty heavy duty. I bought Tulip brand fabric paint in Glacier white matte and also some sponge brushes from JoAnne Fabric.
I then drew out a ribcage on tissue paper, laid the acetate sheet over the top and using an exacto knife, cut out the shapes. When cutting stencils you have to remember to leave connecting spots so that your stencil won't fall apart.
This is what it looks like after it has been used. I would have shown the clear stencil, but it didn't show up. Notice where there are spaces between all of the shapes. That is really necessary.
I put just a little paint in a small bowl and used a sponge brush to apply it.
I laid the stencil over the shirt and taped it in a couple of spots to keep it from shifting. Side note, it will shift and bleed but that's the nature of t-shirts. From a distance it will look good.
Then I dabbed on the paint. I did one layer and then because it was white, went over it again to brighten the white.
Here it is with the paint applied.....
And this is what it looks like fully painted.
Then I worked on the arms, which consisted of the main arm bone and two smaller bones. I could look up the official names of these bones but I don't want to.
This is what the arm looks like.
The above were for the class, but I also needed a full skeleton for the main character named Lucy.
I added a pelvis and lengthened the bones in the arm since the girl who was to wear it is much taller than the others.
The pelvis was a completely different stencil. As you can see the drawings are rough and "close" to accurate, but really I was only trying to get the concept across, not a anatomically correct skeleton.
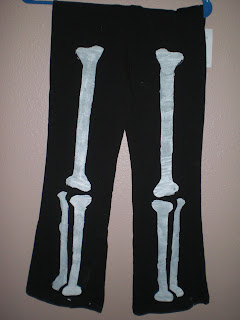
I stenciled leg bones on to a pair of black leggings to complete the look.
And there you have it, just in case you ever need a skeleton costume.
Tuesday, January 3, 2012
Webster describes an heirloom as "something of special value handed down from one generation to another."
I can't say for sure if that's what I've been creating for 40 some years, but maybe.
I started making Christmas stocking in the shapes of shoes when my husband and I celebrated our first Christmas together. As each new child came along I created a new "shoe" and when my kids got married and had their own children, I made more and more. I'm not sure that anybody wants these shoe stockings as they start their own traditions, but as long as there is Christmas in my house, they will hang in it.
These are the stockings I have made over the years. My husband, Jerry's, mine, my daughter, Robin's, my daughter, Roxanne's, my son, Jordan's, my grandson, Macario's and my daughter, Ryun's.
As I continued to make these the designs have gotten more elaborate and more decorated.
This is Emmy's new stocking. It's a cozy little fur-lined
slipper with ribbons and buttons. It makes me think
of my granddaughter as she is warm and cozy, too.
She is oh so huggable!
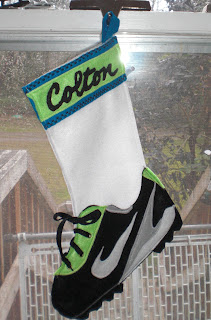
My grandson, Colton is only 2 but I am sure he will be a great football player someday, just like his dad. I made him a football cleat using Seahawk colors and the Nike swoosh.
My newest Granddaughter is Olive. I made her a cute and dainty little "Mary Jane". I kept choosing these colors from my ribbon box and then realized that the green was a perfect olive green. Ah, the subconscious mind is a wonderful thing!
And, finally, my daughter-in-law, Jane's stocking. I chose these ribbons and colors because they are fun and playful just like Jane. She sent me a tutorial on how to make the felt flower on the toe.
So this is Adam's family's new group of stockings.
And this is Aaron's family's stockings. I hope they like the new additions.
I can't say for sure if that's what I've been creating for 40 some years, but maybe.
I started making Christmas stocking in the shapes of shoes when my husband and I celebrated our first Christmas together. As each new child came along I created a new "shoe" and when my kids got married and had their own children, I made more and more. I'm not sure that anybody wants these shoe stockings as they start their own traditions, but as long as there is Christmas in my house, they will hang in it.
These are the stockings I have made over the years. My husband, Jerry's, mine, my daughter, Robin's, my daughter, Roxanne's, my son, Jordan's, my grandson, Macario's and my daughter, Ryun's.
As I continued to make these the designs have gotten more elaborate and more decorated.
My granddaughter, Addie's stocking became a Russian slipper with gold ribbon and trim. The felt even sparkles.
This is Emmy's new stocking. It's a cozy little fur-lined
slipper with ribbons and buttons. It makes me think
of my granddaughter as she is warm and cozy, too.
She is oh so huggable!
My grandson, Colton is only 2 but I am sure he will be a great football player someday, just like his dad. I made him a football cleat using Seahawk colors and the Nike swoosh.
My newest Granddaughter is Olive. I made her a cute and dainty little "Mary Jane". I kept choosing these colors from my ribbon box and then realized that the green was a perfect olive green. Ah, the subconscious mind is a wonderful thing!
And, finally, my daughter-in-law, Jane's stocking. I chose these ribbons and colors because they are fun and playful just like Jane. She sent me a tutorial on how to make the felt flower on the toe.
So this is Adam's family's new group of stockings.
And this is Aaron's family's stockings. I hope they like the new additions.
Subscribe to:
Posts (Atom)